-edible zone-
Q: What is a Teres...?
A: look below.....!
It is
sold as a kit, and some assembly is required.
Date: 5/01/02
*
Here's the breakdown:
The Standard Kit:
Teres Model
135 Acrylic Kit minus tonearm, comes with motor pod, power supply and a
two piece screw-down record clamp.
Options:
Expressimo
Audio modified RB 250 tonearm w/VTA adjuster
Black Diamond Racing
resin cone feet
For more info surf over to this link:
https://www.teresaudio.com/
'Ya-think they put enough acrylic in
it...?
Assembly and polishing, how it went.
Even though
this is termed as a "Do-it-yourself" kit, there isn't much for the
purchaser to do except for polishing the acrylic and then some very
simple assembly. I did the whole thing in the kitchen of my apartment.
Actually I have a garage workshop, but I found working in the kitchen
sink to be more convenient for the wet sanding process. Running water.
The platter comes finished and ready for assembly, but the base and
armboard are in 'as machined' condition. The polishing process is
similar to the color sanding operation used in custom show quality
automotive painting. The surface is sanded with a succession of finer
grit papers followed by a fine polishing compound. After the compound,
the acrylic takes on the look of transparent cut crystal. It's
satisfying to do this work and see the material transform under your own
hands and before your own eyes. It's easy too.
Here is my
approach to the sanding process:
6 inch sanding board.
(pro-quality, purchased at an automotive paint supply store, years ago)
120 grit dry sandpaper
220 grit wet
400 grit wet
600 grit wet
1200 grit wet
3M heavy duty polishing
compound (bought in an automotive paint supply store years ago)
McGuires #5 Mirror Glaze
The process goes like this:
Rough
cut with the 120 dry on the sanding board to cut below all machining
tool marks.
Wet sand with the 220 thru 1200 grits in succession.
It's important not to skip or go lightly at any of these levels as the
finer grit papers just wont cut below coarse sanding marks. I used the
kitchen sink for this wet sanding. With the rubber base of the dish rack
angled against one side of the sink and a heavy sponge for the platter
base to rest on as I did my sanding. This worked well and made very
little mess. All the dust went down the drain. By the time I was at the
1200 grit level, the acrylic was quite transparent when wet and a bit
cloudy when dry. The 3M compound polished the plastic clear and the
McGuires #5 put a finish shine on it.
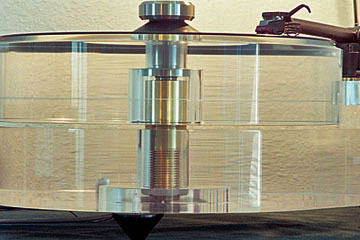
Assembly:
1) The
bearing drop. The spindle and bearing housing undergo an interesting
process of assembly. Due to a close tolerance of fit between spindle and
bearing housing, a structured process of assembly is used. The supplied
instructions were adequately clear so there is no need to improve on
them here.
I'll just say the following: The spindle bearing is a
nice bit of machined hardware. The housing is solid bronze, the spindle
is stainless steel. There is a precision ball bearing that rides between
the spindle bottom and a teflon coated thrust plate in the bearing
housing. The whole assembly is submerged in oil. Installing the spindle
into the housing took over 12 hours to accomplish due to the close
tolerance fit between spindle and bearing in combination with the oil
loaded into the housing sump prior to assembly. The spindle drops easily
down to the pool of oil in the sump. There the spindle stops solidly
with no cushion. Brick wall. Then the platter is installed over the
spindle to add weight and push the spindle on it's way down to the
housing bottom. Over time oil is displaced up past the microscopic gap
between spindle and bearing and thus allows the spindle to make it's way
down to the bottom allowing the ball bearing to ride solidly against the
thrust plate. Once the spindle is fully home, there is visible oil
clinging between spindle and housing at the top. This can be seen
through the acrylic platter. It looks as though the spindle rides in an
oil-bath vacuum. Neat.
2) Arm board and tonearm. Straight forward
stuff here to anyone who has ever aligned a cartridge except that the
pivot to spindle distance must also be set. This is simple as the arm
board is secured to the plinth by a single bolt. Loosening that bolt
allows the arm board to swing into position. I took advantage of the
Clearaudio protractor I have to set the spindle to pivot distance,
stylus overhang and offset angle. Piece of cake.
The Expressimo
RB 250 'modified' tonearm:
*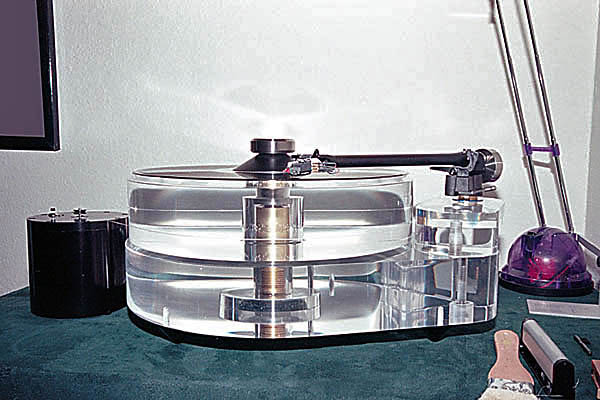
The difference between this tonearm and the 'standard issue' Rega RB
250 is that Expressimo has exchanged the plastic counterweight
stub-shaft at the end for a stainless steel one. Expressimo has also
manufactured an offset counterweight that locates the center of it's
mass approximately at stylus level for improved tracking. Another
improvement on this arm is an upgrade Cardas wire set.
The
cartridge clips are springy and snap over the posts locking into final
position.
 (click thumbnail for full size image)
Above: close-up view of
Cardas clips plugging into the Shure
BTW, the buzz on the RB250
is that when modified as above, it becomes superior to it's more
expensive siblings in the Rega product line. The difference being that
the more expensive Rega arms employ a Vertical Tracking Force adjustment
mechanism. This device has just enough 'ring' to it to add a resonance
of it's own to the arm and subtract a tiny bit from the pick-up signal.
The '250 has no such VTF adjuster and therefore does not have this
problem. The cheap arm wins. How nice for us, the teaming masses. Power
to the people.
VTF (vertical tracking force) adjustment is
accomplished by sliding the counterweight into position on the end stub
and then tightening an Allen set screw. Not elegant, but effective. Of
course, you'll need a scale to set tracking force with this rig. Then
again, a scale should be used with all arms so it's really a non-issue.
VTA (vertical tracking angle) adjustment is accomplished with
another Expressimo manufactured device. It is a simple threaded collar
that screws on to the threaded barrel of the tonearm. Fitting between
the tone arm and the arm board, VTA is adjusted by turning the collar.
It seems easy, and is, however this can't be accomplished without
removing the tonearm from the arm board. Fortunately, this is not
difficult to do with the Teres as the arm board is pretty much hanging
out in the breeze, allowing full access underneath to the tonearm
retaining nut. It is recommended that the retaining nut be torqued to
just beyond 'finger tight'. A light touch is required.
Pivot to
spindle, effective length, overhang and offset angle were set with a
Clearaudio alignment protractor.

Above: view of VTA adjuster and off-center"heavy weight")
Cartridge:
I chose to use the Shure V15VxMR I've been using on my
Thorens. This cartridge has 6 mos. use on it and as such is just nicely
broken in. It also makes it convenient to make a comparison in sound
between the new Teres and the old Thorens. More about that later. The
Shure mounted easily to the RB 250 arm and aligned with no fuss. This
may not be the ultimate cartridge to use on the RB250, but it tracks
well and offers great sound for it's price point. It has a stylus guard
too...!
Motor and Drive 'String':
*
Above: drive motor pod with silk bead cord
Motor
arrangement. An infrared optical sensor installed to the acrylic
base reads a strobe grid on the platter bottom. The signal is regulated
by microprocessor with some circuitry designed by Manfred Huber and
built by the team at Teres. Nice work on this one I'd say. Operation is
straightforward. There is a pushbutton to start the motor. Push it for a
short moment and up comes 33-1/3 rpm. Hold the button down longer and
you get 45rpm. A red L.E.D. tells us the motor is still spooling up. A
flashing green L.E.D. let's us know it's getting close. When fully up to
speed, the red goes out and the green is constant. Should the rpm waver
for any reason, the red comes back on. I see this when I use the carbon
fiber brush at the start of play each time.
Another, very
pleasant way to operate this table is by simply giving the platter a
gentle push in the correct direction. The motor will start this way. You
can stop the platter simply by stopping it with your hands. I get a
certain satisfaction using the table this way.
Then there is
the drive string. Extended use suggests that drive pulley needs to
be closely parallel with the platter. If close parallelism is not
maintained, the silk string begins to ride against a corner of it's
pulley and the resulting increased drag is enough for the string to slip
on the pulley. This slippage will start a chain of events involving the
speed calibration circuitry in the controller that will lead to an
audible pitch variation (music slows down). I found this to be very
disturbing at first. Now that I understand it, I simply maintain good
parallel alignment between pulley and platter, and I hear no more of
this.
Test Record Time:
I use the HFNRR test record for
making final arm/cartridge adjustments. Here is the final test report
from that session:
Tonearm = Expressimo RB250
Cartridge =
Shure V15VxMR
Vertical Tracking Force. 1-1/8 gram set with Shure
SFG-2 scale.
Side 1
Track 1) Channel
orientation...............pass
Track 2)
Phasing..................................pass
Track 3)
Balance..................................pass
Track 4) Balance,
left...........................pass
Track 5) Balance,
right.........................pass
Track 6) Anti
Skate...............................pass
Track 7) Anti Skate,
higher..................pass
Track 8) Anti Skate, higher
still............Fail
(note, I used Track 8 to fine tune anti
skate resulting in a mild buzz right channel when Anti Skate was set at
15/16 g. The best result I could get for Track 8. This is my final Anti
Skate setting. It's also worth noting that my Thorens never got to this
level. It would simply fail at track 6. The Expressimo RB250 is
obviously a better tracker than the TP16 MK I of the Thorens. This,
using the same cartridge in both arms.
Track 9) Anti Skate, even
higher.........Fail, jumps out of track.
Side 2
Track 1)
Tracking...................................pass
Track 2) Lateral
arm resonance...........9hz, big wobble
Track 3) vertical arm
resonance...........12hz, little wobble
Track 4)
Tracking....................................pass
Track 5)
Cartridge align - azimuth.........pass
Track 6) Residual
background noise....quiet well beyond any listening level
Track
7) Tracking.....................................pass
Operation:
see Review of Teres 135
The Teres Record Clamp:
The record
clamp is a stainless/delrin 2-piece assembly and secures itself over the
record by engaging threads on the spindle center pin. Function is very
good. There is also a delrin spacer that fits under the record to assist
in giving clamping direction to the vinyl. In many cases clamping is so
good that the record shows visible evidence of a slight vacuum when
taking the record off the platter. I'm truly impressed with this.
*


The Teres Platter Mat:
Guess what...? There is no
platter mat with the Teres...!
RB 250 operation:
It looks
a little precarious having the cartridge 'hanging' out in space the way
it seems to. I find the cue device to function adequately for safe
operation of the arm. By leaving the cue lever in the 'up' position,
there is no worry about the stylus dropping below record level. The arm
drop is nicely damped by the cueing device and is accurate enough to
place the stylus anywhere one likes at will. This arm will be easy to
live with.
Date: 5/13/02,
New addition of a "Shelter
model 501 type 2" cartridge.
*
Date: 10/02, Signature Motor Controller Upgrade (see Teres 135
review)
Date: 11/02, Wright WPP100C Phono Preamp with MC Step-Up
Transformer (See review)
For a review of the Teres' sound
link here. Teres 135 Review